PiPhone is an attempt to build a custom smartphone using Raspberry Pi, SIM 900 GSM/GPRS module, and PITFT touch screen. The compactness of Raspberry Pi and SIM 900 prove to be of great advantage as the PiPhone easily fits in your palms. Though this may not be a replacement for the smartphones available in the market costwise, this certainly is an interesting raspberry-pi projects.
Raspberry Pi is a light and compact computer ideal for our smartphone project. It is developed by Raspberry Pi foundation. It is so compact that all the components of a computer fit into a small credit card sized circuit board. It boots runs most UNIX-like systems and Microsoft Windows. The officially supported operating system is Raspbian based on Debian GNU\Linux. Visit this link for more information about Raspberry Pi.
SIM 900 is a quadband GSM/GPRS 850/900/1800/1900MHz module from SIM Com. It is an SMT module of a very small form factor. It operates within a supply voltage range of 3.4 – 4.5V. It can operate in a wide temperature range of -30 to +80 degrees Celsius. The module is extremely light weighing only 3.4g. The compactness and lightness of SIM 900 makes our PiPhone light and compact enough for using it comfortably with one hand.
PITFT is an assembled TFT plus touch screen with a resolution of 320X240. The display can be used as a mini console, X Window port and for viewing images and watching videos. The PITFT is interfaced with the Pi using the SPI pins and a few GPIO pins. You can learn about them in the tutorial accessible from the link given above. It is very easy to plug it on top of your Raspberry Pi which is ideal for our PiPhone.
The hardware used in this raspberry-pi projects are mostly off-the shelf and require little wiring and soldering. These are preassembled modules and a few other things as given below.
To set up your Pi you must have a microSD card bearing an operating system. It can be Raspbian or any other UNIX like operating system. Download the image of the operating system of your choice and load it to your microSD card. Insert the card into your Pi and power it on to see it running. You can make additional tweaks as per your requirements. See the tutorial on the link below for detailed description.
https://www.mepits.com/project/228/DIY-Projects/How-to-make-a-Raspberry-Pi-Web-Server
PITFT comes in two models – capacitive and resistive. In this raspberry-pi projects we are using the resistive touch screen. For PITFT to work you need to have the right configuration for your kernel. If you have installed Raspbian you may make changes to it which will be a great learning experience. If you feel tentative you can use a custom Raspbian image by Adafruit.
PITFT image from Adafruit :- http://adafruit-download.s3.amazonaws.com/2015-02-16-raspbian-pitft28r_150312.zip
You can also find instructions to assemble the PITFT in the Adafruit website.
Instructions :- https://learn.adafruit.com/adafruit-pitft-28-inch-resistive-touchscreen-display-raspberry-pi/assembly
To make these Kernel configurations you have to login to your Pi from your PC using PUTTY as explained in the tutorial mentioned in step 1. From PUTTY you may download the kernel using curl and install it.
Command :-

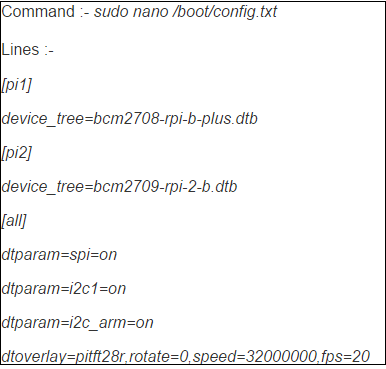
Now we have to add the device tree overlay by adding some lines to /boot/config.txt. You can use GNU nano to do so. Save the file and reboot using sudo reboot. If the screen turns white and then black everything id fine. Otherwise check your connections.

From PUTTY start Xorg to check if the display works properly.
Commands :-

Now, edit /etc/modules using nano and add stmpe-ts on a new line at the end. Reboot and run dmesg. Check STMPE610 detection and the ILI9340 screen frequency. Setup touch screen configuration by adding some lines into configuration files as given below.

Start Xorg again with FRAMEBUFFER=/dev/fb1 startx. Use nano to edit the .profile file in your home directory and add FRAMEBUFFER=/dev/fb1 startx at the end. This will help you to start Xorg with just the startx command.
Get the code for PiPhone and unzip the contents. Enter the newly created folder and run the Python script as administrator.
Commands :-

To make the code run on startup edit /etc/rc.local and add the lines below before exito.

Edit /etc/initab and add a # before the line that contains getty and /dev/AMA0.
Step 5 :- Hardware Set Up
Connect Raspberry Pi and GSM module as shown in the table and use a DC-DC boost converter to power the Raspberry Pi and PITFT.